Open topic with navigation
How to Merge Several Monochrome Images
In HCImage, there are a couple of ways to create a merged image. The procedure outlined below describes the drag and drop method of combining multiple images into a single merged image. Keep in mind that the original image is not altered, the merged image is layer that can be turned on or off. In order to keep the merged image, the display image must saved, see below.
- Open all of the images that will be merged.
- Click the Toggle SideBar icon (
 ) if the SideBar is not visible. The Toggle SideBar icon is located in the Status Bar at the bottom left corner of the image.
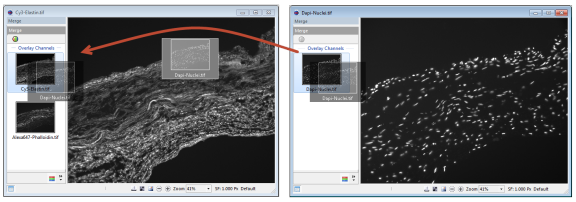
- Select a source image and then drag and drop the thumbnails of the other images on to the thumbnail of the source image. The merged image is displayed along with thumbnails of each of the overlay channels.

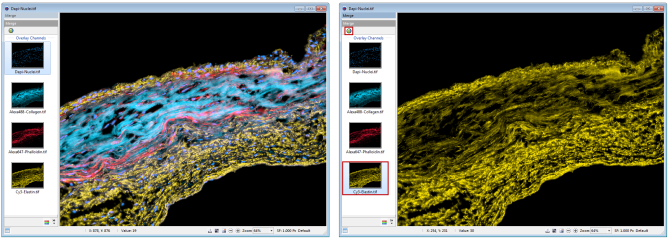
- Apply color to an image, right-click on a thumbnail and select a tint from the Tint drop-down menu. Repeat the process for each image.
- Adjust the contrast for the individual overlay channels, right-click on the thumbnail and select Contrast. Make adjustments using the sliders in the Display Contrast dialog.
- Click the Split Channel icon (
 ), located in the top left corner of the SideBar, to enable viewing of the individual overlay channels. When Split Channel mode is enabled, click on a thumbnail to display the corresponding overlay channel. Click the Split Channel icon to view the merged image.
- [Merged Image On/Off] Right-click on a thumbnail and select Merge On or click the Apply Merged Display icon (
 ) in the Display toolbar.
- [Save the Display Image] Right-click on the image > Save Image to File > Display Image > Enter file name > Save.

 ) if the SideBar is not visible. The Toggle SideBar icon is located in the Status Bar at the bottom left corner of the image.
 ) if the SideBar is not visible. The Toggle SideBar icon is located in the Status Bar at the bottom left corner of the image.
